Introduction
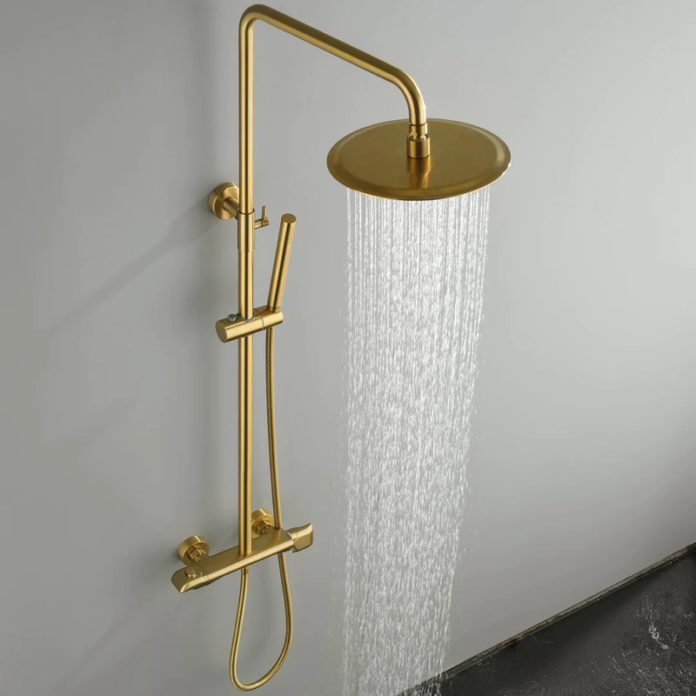
Exposed Shower System Definition: Shower systems that have exposed pipes and components give off an industrial, modern aesthetic. Exposed showers, as opposed to hidden systems, give a distinctive touch to bathroom design.The Value of Correct Installation: In addition to guaranteeing optimum performance, proper installation guards against problems like leaks and poor water flow. You may easily manage the installation process with the aid of this tutorial.
1: Assessing Your Bathroom
Assessing the Current Plumbing
Examine the plumbing configuration in your bathroom before beginning the installation. Verify that the extra fixtures of an exposed shower system can be supported by the current plumbing.
Selecting an Appropriate Wall for Installation
Select a wall that will allow the exposed plumbing to be installed without sacrificing structural stability. Think on things like aesthetics and accessibility.
Ensuring Adequate Water Pressure
For best results, exposed shower systems need to have enough water pressure. Verify the pressure in your water and think about installing a booster pump if necessary.
2: Compiling Equipment and Supplies
Essential Plumbing Components
Verify that you have every pipe, fitting, and connector required for plumbing.
Selecting the Right Exposed Shower System
Choose an exposed shower system that aligns with your preferences and bathroom design. Consider factors like finish, features, and ease of maintenance.
3: Preparing the Installation Site
Clearing the Work Area
Remove any obstacles or items from the installation site. Clearing the work area provides a safe and unobstructed space for the installation process.
Turning Off Water Supply
Locate and turn off the main water supply to the bathroom. This prevents water flow during installation and minimizes the risk of leaks.
4: Recognizing Components of Exposed Shower Systems
Primary Valve
Imagine reaching behind the showerhead during a power outage, fumbling for the valve in the dim light. Not ideal, right? Instead, envision it conveniently positioned near the entrance, beckoning with a clear handle or lever. This accessibility is not just about aesthetics; it simplifies turning off the water in emergencies and facilitates routine maintenance.
Showerhead and Arm
Select an appropriate height for the showerhead and arm, considering the comfort of users. Ensure a secure attachment to prevent any wobbling.
Additional Features (e.g., Handheld Sprayer)
If your exposed shower system includes additional features like a handheld sprayer, plan their installation in conjunction with the main components.
5: Installing the Main Valve
Locating the Ideal Position
Identify the ideal position for the main valve on the well, considering both functionality and aesthetics. Mark the location before proceeding with the installation on Wellfor, ensuring that it aligns with the specific requirements and design principles for optimal performance and visual appeal.
Connecting to Existing Plumbing
Carefully connect the main valve to the existing plumbing. Use appropriate connectors and ensure a tight seal to prevent leaks.
Securing the Valve in Place
Once connected, secure the main valve in place. Ensure it is tightly fastened to the wall, providing stability during operation.
6: Attaching the Showerhead and Arm
Choosing the Right Height
Determine the optimal height for the showerhead and arm. Consider the preferences of potential users and adjust accordingly.
Ensuring Secure Attachment
Attach the showerhead and arm securely to the plumbing. Use thread seal tape to prevent leaks at the connections.
Sealing Connections to Prevent Leaks
Apply a waterproof sealant to all connections to further prevent leaks. This step is crucial for maintaining the integrity of the installation.
7: Integrating Additional Features
Installing Handheld Sprayer
If your exposed shower system includes a handheld sprayer, follow the manufacturer’s instructions for installation. Ensure proper functionality and stability.
Configuring Thermostatic Controls
If your system has thermostatic controls, set them according to your preferred water temperature. Test the controls to ensure accuracy
Conclusion
In conclusion, meticulous planning, tool preparation, and attention to detail are necessary for constructing an exposed shower system. You can guarantee a successful installation that improves your bathroom’s appearance and use for years to come by following these instructions, which include determining whether your bathroom is suitable for the installation and correctly sealing any connections. To ensure a safe and enjoyable showering experience, don’t hesitate to ask a professional plumber for advice if you have any questions about any stage.
FQA’s
Is it hard to install an exposed shower system?
Even though it calls for preparation and work, this article offers a step-by-step procedure that is appropriate for novices as well as DIY enthusiasts.
What’s the most crucial step?
Proper assessment! Ensure your plumbing can handle the system, choose the right wall, and verify sufficient water pressure.
Which supplies and tools do I need?
Simple instruments such as wrenches and screwdrivers, as well as the pieces of the particular shower system and appropriate plumbing parts.
How do I prepare the installation site?
Clear the area, turn off the water supply, and ensure good ventilation, especially when using sealants.
What are the key components and how do I install them?
Understand the main valve, showerhead/arm, and any additional features like handheld sprayers. The guide details their installation steps, including valve positioning, secure attachment, and leak prevention measures.


