Home Blog Page 25

Why Prefab Metal Buildings are the Preference for Businesses

0

Why Metal Buildings are the Best Choice for any store

It’s no secret that prefab metal buildings are the future in terms of brick-and-mortar business establishments. With nearly 80% of all new business construction projects being metal-based, more and more companies are taking advantage of the vast benefits steel has to offer. It’s a simple, cost-effective means to get your business off the ground with none of the headaches found in traditional building styles.

Wooden buildings have been a building staple for many generations, but they’re rigid, cumbersome, and come with a host of troubles not found in newer construction types. Contemporary wooden buildings can take months, if not years to erect, but commercial metal buildings can be assembled in mere days. There’s a reason superstores like Walmart, Costco, and Target have chosen steel structures as their go-to building solutions.

They are also built to last for decades and offer substantially more protection from harsh weather than the competition. Wooden structures are not known for holding up well to the forces of Mother Nature. Steel naturally flexes when faced with outer forces like wind, rain, and seismic activity, giving it the natural ability to withstand forces that would bring other construction types like wood or concrete to the ground. This is why many large bridges and infrastructural elements are constructed from steel.

And who doesn’t want to save the environment? Steel is 100% recyclable and a much easier resource to cultivate compared to wood. By choosing steel as your next building material, you’ll do your part to reduce your carbon footprint, save trees from the axe, and help reduce the over impacts of climate change.

Cost-Saving Advantages Commercial Metal Buildings Provide

Metal buildings possess far more qualities than just sheer good looks! Choosing to construct your business out of metal comes with a ton of extra benefits, with one of the most significant being the weight of your wallet. Custom metal buildings are considerably less expensive than traditional stick-built structures. And that’s just in terms of construction costs! But what about after the ribbon cut? Steel buildings require substantially less upkeep throughout their life, saving you money year after year on maintenance costs.


Steel buildings are forged from galvanized steel, making them resistant to rust, water damage, and pest infiltration. Wood burrowing insects like termites and carpenter bees are a non-issue with metal buildings.

What Types of Businesses Use Commercial Metal Buildings

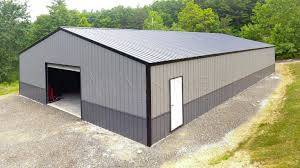
Metal buildings aren’t just for carports, garages, or barns anymore! These structures are efficient, sturdy, and ready to take on just about anything you can throw at it! There are many types of businesses where metal excels over traditional building methods.

1. Offices

A prefabricated metal building is a fantastic choice when constructing office spaces. With the power and versatility of steel, you can pick a set of dimensions that works for your company size and design a customized workspace that fits all your needs.

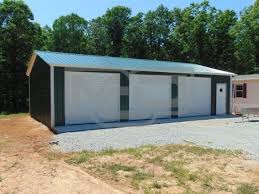
2. Agricultural and Farm Buildings

Steel buildings are perfect for farmers hoping to find a long-lasting solution for housing their livestock. But that’s not the only use metal structures have to offer the farm! Metal buildings are perfect for both heavy equipment storage and protecting crops like corn or grain from the elements. Steel buildings even make great finished farmhouses!

3. Commercial Workshops

Steel buildings are naturally resistant to fire damage, making them an excellent choice for glassblowers, welders, metal workers, and any business that operates in hot, fire-prone environments. If you hope to open a garage, welding shop, or a mill,  metal buildings are the right way to go!

4. Manufacturing Plants

Factories have long had the right idea to use metal buildings! When handling heavy, specialized equipment, it pays to have a facility that can quickly adapt to your needs. Metal structures possess this in spades. Additionally, clear span-style metal buildings offer tons of open square footage, giving your company ample room to prosper.

5. Commercial Aircraft Hangars

Much like the manufacturing sector, steel and metal structures have been a regular presence for decades. And for a good reason! By providing an abundance of available square footage to match the lengthy wingspans of most aircraft, metal buildings make perfect commercial aircraft hangars, giving owners ample room to taxi to their heart’s delight.

6. Restaurants

Unlike the others, most people won’t immediately think of metal buildings when it comes to their favorite eatery. But why not? Customizable metal buildings provide a spectacularly efficient means to build a restaurant. Steel structures offer plenty of dining room and kitchen square footage, as well as ample room for additional storage. And once finished, a restaurant can be designed to match any visual aesthetic.

7. Warehouses

Warehouses all require tons of open space to operate efficiently, and metal buildings provide that with ease! Clear span metal structures offer an incredible amount of open space, sometimes nearly matching the square footage of the entire building footprint. For warehouses that need ample storage room, steel buildings are the prime choice.

Conclusion

By now, the advantages of choosing to construct your next retail, office, or manufacturing space from steel should be so evident that you’ve stopped reading this piece and picked up a phone to start the design process with a representative. Metal structures provide the streamlined construction and versatility to get your business up and running in no time! Whether you operate a storefront, a business office, or a factory, metal is one the best ways to save you time, money, and stress.

And the benefits won’t end after construction is completed! You’ll continue to save untold sums in terms of repair, maintenance, and general upkeep costs compared to similarly sized stick-built buildings. Wood frames and shingles simply won’t ever size up to the sheer might of American galvanized steel. They can’t compete in terms of resistance to the elements, and they won’t ever beat the longevity steel provides.

The History of Lawns

0

We Americans take pride in our lawns. From erecting fancy lawn architecture to trimming the grass in elaborate patterns, we can’t get enough of it. It’s somewhat of a Sunday ritual, a therapeutic display of mastery over our environment. But have we always been so prideful about our yards?

In this article, we uncover the history of lawns. For such a seemingly boring topic, the history of the lawn is surprisingly rich. Ranging from ancient Greece to English landscape architecture and the American suburb, you won’t yawn while learning about lawns.

Prepare to be on the edge of your seat. We’re taking you on a journey to discover why we spend so much time cutting our grass and installing gazebos.

Ancient Greeks, Geometry, and Formal Design

The western world draws heavily from Greek culture. One of the traditions passed down from the Hellenists is their love of symmetry and equal proportions, which you can see all over the Western world in lawns.

As it pertains to lawns, the Greek’s love of geometry directly influences the lawns you see today. What you may not consider is the close connection the Greeks saw between the two subjects. The Greeks saw the world in harmony when they combined aesthetics with mathematics. In fact, to them, the two were the same.

They harnessed beauty by mastering mathematics. They might not be able to control nature, but they could form art using it. Straight lines, level planes, and perfect circles represent order and you can see these elements in all of their architecture. You can see the same attention to detail throughout western history, and modern landscape design is no exception.

Formal Lawn Design and the English Revolt Against It

It’s easy to take the struggle with nature for granted in the modern world. But for Europeans as far back as the Greeks and the Romans, nature represented imminent threats. That’s why they conformed plants to a geometric layout- it was people’s way of controlling a harsh, chaotic reality.

For example, the Romans used boxwood shrubs (a plant that easily conforms to structures) in their formal gardens to establish a framework for the rest of the garden. The boxwoods didn’t establish a central theme, but they formed the foundation for which the central theme could take shape. Pliny the Younger describes his estate in Tuscany and explains the boxwood hedges divvying the landscape into specific sections, depicting animals and further asserting his dominance over nature.

Throughout the medieval period, as with most other things culture-related, landscape design waned. However, during the Renaissance, Italy brought back formal landscape design on a grand scale. European landscape design culminated during Louis XIV’s reign over France at the classical French garden at Versailles.

However, formal landscape design, reserved for royalty and palaces, began to change with the dawn of the English cottage garden. Alexander Pope, an English poet, was one of the catalysts from this shift to informal lawn design.

Pope advocated for a return to simplistic elements and a more natural decoration style. He didn’t believe there needed to be elaborate designs to foster nature’s beauty. He believed nature was already beautiful and that you could simply add natural elements to the existing landscape to accomplish beauty.

English Cottage Gardens

The English cottage movement removed some of the stuffiness about formal landscape design. The English cottage garden was a part of the Romantic movement and a revolt against Classicism. It was an appreciation for the existing order, discipline, and moderation of the natural world.

It placed the European peasantry on a pedestal, previously despised and downtrodden throughout Europe. The peasantry originated and maintained cottage gardens before they became trendy and a sign of affluence. The core of the English cottage garden wasn’t purely aesthetic. It was practical and had culinary as well as medicinal purposes. Fruit trees were an integral component.

However, after the aristocracy caught the trend, this element shifted to incorporate more aesthetically pleasing features. You can see this shift in the influence of landscape painting, perhaps best represented in French impressionist Claude Monet’s paintings.

The English cottage garden was the precursor to the American lawn, and many elements remain. The abundance of rose bushes, perennial flowers, tendrils draped over dividers, and stone walkways are a critical component of American landscape design. However, despite the English influence, there’s no doubt the lawn is the centerpiece of American landscape design.

Communist-Fighting America

English cottage gardens influenced the American lawn, but three other distinctive American influences spawned the yard. The first element was Levittown, the most well-known and one of the first cookie-cutter towns in America. Levittown offered built-in lawns for tenants upon move-in.

The Levitts built subdivisions in New Jersey, Pennsylvania, Cape Cod, and Puerto Rico, effectively pioneering the American lawn. Residents were responsible for lawn upkeep and fencing the yard within their property. Levittown newsletters stressed the importance of weed-free, closely shorn lawns. They also detailed lawn care best practices.

The second factor promoting lawns in the 50s was the return of GIs. The lawn appealed to GIs, in large part due to their military training. Cleanliness and orderly quarters were imperative for soldiers.

Finally, the element that tied these two factors together was the emergence of lawn care products and technology. With lawn-care technology, a weed-free lawn was possible. Since the 50s, the lawn has been a permanent fixture of American and Canadian culture.

Conclusion- The History of Lawns

There you have it- the reason we spend so much time peering out the window to see if thee bushes are pruned and if the grass needs mowing. The lawn has always been a source of human pride.

From the Greeks and Romans using the lawn as a coping mechanism, to the English extending creating an informal landscape design, and finally, to America, where the middle class could take pride in its land, the lawn has always been an artistic expression of humanity’s struggle with nature, and our attempt to conquer it.

The next time you look out the window, remember why you love that symmetry. Recognize the connection your lawn represents between you and your ancestors, and check yourself when you consider letting those weeds overtake your front yard.

What Does a Modern Kitchen Plan Look Like?

0

What’s the secret to timeless kitchen design? Well, there isn’t just one. It’s all about crafting a kitchen space that fits your needs, style, taste (and, of course, budget). While there are several popular kitchen design styles, such as contemporary, traditional, or farmhouse, more and more homeowners are turning to the modern kitchen plan to transform their cooking and dining experience. But what exactly does a modern kitchen plan look like?

Here, we’re taking a closer look at the modern kitchen—one of the most popular and prominent kitchen styles since the early twentieth century. First, we work to understand what we even mean by a “modern kitchen.” Then, we offer a few practical tips to help you design your very own modern kitchen plan.

WHAT IS A MODERN KITCHEN?

We call this style sleek, simple, or midcentury, but what does a modern design really mean? The design style we call “modern” began roughly around World War I. Modern kitchens feature flat surfaces, geometric shapes, and tend to go light on embellishments and all the extra bells and whistles you might find with more lavish styles.

WHY CHOOSE A MODERN KITCHEN DESIGN?

There’s a practically endless number of ways that you could design your kitchen. This fact, then, begs the question: why do so many homeowners choose to implement a modern kitchen plan? Of course, there are countless reasons, but there are some key reasons why people love this simple and elegant aesthetic.

Here are just some of the reasons why a modern kitchen design could be perfect for your home:

  • Simplicity.
  • Functionality.
  • Smooth and sleek appearance.
  • Easier to clean and maintain.
  • Complements other designs styles.
  • Looks great.

TIPS TO DESIGN A MODERN KITCHEN PLAN

Now that we have a better understanding of what a modern kitchen design means, the next step is to make it happen. What are some practical tips to help you bring a modern kitchen design to life in your home? Look no further. Read on to learn about how you can implement your very own modern kitchen plan.

1. Natural materials.

Go back to the basics by incorporating a range of natural materials in your modern kitchen design. Marble countertops, wood-stained cabinets, or an exposed brick backsplash can all add a classic, almost rustic, touch to your new modern kitchen while keeping that sleek feel. Natural wood used throughout adds a unique texture to any of your surfaces. However, don’t go overboard with a slew of natural materials as it can make your kitchen look crowded and muddled.

2. Flat surfaced and straight lines.

A key feature of the modern kitchen is flat surfaces and geometric shapes for your countertops, cabinets, and appliances. This all comes down to the simplicity and functionality created by this direct design choice. Incorporate long rows of kitchen cabinets for a seamless look. Consider adding a long, geometric island as the centerpiece for your modern kitchen. Not only will it look great, but it’s also a pretty versatile feature. Use the island as room for meal prep or pull up a couple stools and use it for dining or entertainment.

3. Frameless kitchen cabinets.

Sticking to the theme of straight, simple lines, nothing says a modern kitchen design like frameless kitchen cabinets. Also called full overlay or full access, frameless kitchen cabinets offer a clean and simple dynamic to your cabinetry design. It also allows your cabinets to blend seamlessly with your appliances and countertops.

4. Monochromatic colors.

Modern kitchens can be flashy in a classic, subdued fashion. Establish this aesthetic by using a monochromatic color palette for your kitchen space. Using a bright white as your primary color with accents of gray or black is a popular color palette for many modern kitchen designs. For an extra touch, wood cabinets can help maintain the simple color layout while featuring a unique shade and texture. Remember, with a modern kitchen, it’s all about simplicity.

5. Industrial accents throughout your modern kitchen.

There are several different ways that you can adapt a few thoughtful industrial accents into your new kitchen space. Exposed brick for your backsplash is a great way to add texture and a spark of color to an often overlooked part of the kitchen. If you don’t have a ton of extra space, an open ceiling that reveals pipes can also work as an accent to your kitchen décor.

6. Sync up your kitchen appliances.

Consistency and simplicity go hand in hand when crafting a modern kitchen design. When selecting your kitchen appliances, ranging from your refrigerator, oven, microwave, down to your toaster or blender, try to keep the design and colors as consistent as you can. Classic black or white works well for most kitchen appliances and is much easier to match up. Additionally, think about your number of appliances. In an attempt to avoid a cluttered look, make sure you have space for storage.

CONCLUSION – WHAT DOES A MODERN KITCHEN PLAN LOOK LIKE?

A modern kitchen can truly revolutionize your home. Often referred to as sleek or simple, a modern kitchen design brings your cooking space back to the basics by focusing on flat surfaces, geometric forms, and simple, yet elegant, design features like backsplashes. Homeowners love the modern kitchen design because it doesn’t distract or complicate your space. Modern kitchens allow you to focus on what your kitchen is for—creating and sharing your favorite meals—while doing so in a smooth and sleek zone.

You don’t necessarily need to spend endless dollars to create an award winning kitchen with a modern kitchen design. By using natural materials, simple hardware, consistent colors, and going light on the industrial accents, you can transform your kitchen space into a modern masterpiece. But remember, it’s still coming down to your personal style and taste. Feel free to play around with the modern style and add your own touches so that your kitchen feels just as much a part of your home as every other room.

4 Reasons to Get a Fountain for Your Garden

0

Decorating and designing your garden is one of the essential experiences of summer. A great way to upgrade the atmosphere and appearance of your garden is to add a backyard fountain. There are many options for purchasing a traditional or modern outdoor fountain in terms of cost and presentation, which means there is sure to be a fountain that fits in perfectly for your backyard.

Contrary to popular belief, adding in a fountain for your backyard or outdoor space is unlikely to have any impact on your water bill or usage. A pump system usually recycles the water in a garden fountain. For most fountains, the water is replaced manually. Thankfully, this process is relatively straightforward.

Outdoor fountains are usually equipped to handle any type of weather and use minimal electricity. There are even a few higher-end garden fountains out there that don’t require electricity and are solar-powered instead. In any case, owning and maintaining a garden fountain is easy. With that in mind, let’s take a look at a few reasons why you should consider adding a fountain to your garden this season.

Peaceful Atmosphere

For home and garden enthusiasts, the backyard is an extension of your living space. One of the easiest ways to enhance the atmosphere of this outdoor space is with a garden fountain. Fountains add a relaxing and zen soundscape to the garden and inspire you and your family to spend more time outside.

The calm and peaceful effect of a fountain turns your backyard into a natural retreat that fits perfectly with the summer and fall heat waves. The presence of water in the backyard is also reportedly great for keeping up with the central principles of feng shui by adding in the water element. Large garden fountains can also boost the humidity in the near vicinity, which can be beneficial for many plants.

Appearance and Design

Fountain designs range from the contemporary and modern to the traditional and ornamental. Many fountain designs provide a talking point for guests and are an attractive boost to your backyard space. For example, a garden fountain that sits in the middle of the garden is a great focal point around which the rest of the yard is centered. For this type of setup, you will need a rounded fountain. Many fountains are only built to be backed up against a fence or outside wall.

For many gardens, a fountain is a great way to boost a corner where the plants are less colorful or well-organized. There are many plants designed for pairing with fountains that provide a more tropical display to fit in with the water. Here are a few ideas for planting around fountains that can be helpful for outdoor planning this summer.

Alternatively, there are many designs for fountains that fit in best when surrounded by rocks, gravel, or sand. These fountains typically stay away from rounded edges and have a clean, simplified, and modern presence. A well-arranged fountain can visually elevate your garden and is often worth adding to your garden for this reason alone.

Sound and Ambiance

When shopping for a garden fountain, you may notice that many of the options available are priced higher or lower based on the sound they create. Usually, the less noisy fountains are more expensive, whereas the louder fountains are cheaper because of the water movement they require to operate. However, picking up a completely noiseless fountain may not be the best option.

The sound provided by a garden fountain can go a long way in creating a peaceful and relaxing atmosphere. On the other hand, the fountain noise can be helpful for blocking out the sounds of nearby urban life, such as noisy neighbors, streets, or highways.

If you are interested in a garden fountain for reducing urban noise, then the lower-priced options available may be more useful. Make sure to consider the size of the fountain and the distance the water drops when trying to estimate what kind of sound the fountain will create.

Increased Property Value

Adding a garden fountain can make an immediate impact on the backyard’s appearance and ambiance while carrying a few long-term benefits. If you are thinking of selling your home in the future, a backyard fountain can help to increase the marketability of your home. However, this only applies to larger fountains permanently installed in the yard, which design companies usually construct with stone or metal. A fountain paired with a garden pond can be an even greater selling point for listing your home, simply because of the unique atmosphere this combination provides.

Conclusion– 4 Reasons to Get a Fountain for Your Garden

There are many designs and pricing tiers available when purchasing an outdoor fountain. Many fountains have quick install guides included and only require you to add water and plug in the pump. Other larger decorative fountains may have different setup requirements that will require hiring an electrician. Once installed, a garden fountain will cost you very little time and money to maintain.

Creating a natural habitat surrounding your fountain with a pond or collection of plants can help to attract birds and other wildlife. There are many ways to set up a water structure in your backyard that is both soothing and practical.

You can quickly upgrade your garden’s natural decor and ambiance with a traditional or modern outdoor fountain. Whether you add in a fountain as a central focal point or a design feature for a corner of the garden, the inclusion of falling water adds a relaxing element to the backyard’s atmosphere that will inspire you and your family to spend more time outdoors this summer.

Pilea Peperomioides : Tips to Care and How to Grow It Straight Up

0

Homesfornh.com – Pilea peperomioides is an evergreen plant that has myriad round leaves. This plant has attractive foliages to be an indoor ornamental plant. It is a sun-lover plant, it will grow well under bright indirect light. This plant is different from Peperomia. Both almost look the same but it is a different plant. Pilea Peperomoides is a species of the Pilea genus. The Latin name Peperomoides means Peperomia-like. If you want to know more about this plant, let’s discuss it in this article. Check this out!

How to Take Care of Pilea Peperomioides

Growing Peperomioides indoors is a beneficial activity. This plant should get bright indirect light when you put it indoors. However, you need to know more tips to make your houseplant stay healthy and growing vigorously like a giant plant.

  • The Need for Sunlight

The Need for Sunlight

Peperomia likes to get enough sunlight. The south-facing window is an energetic place to grow this plant. Peperomia will grow in the direction of the sun, thus you can rotate the position regularly to ensure that all sides get the same nutrition from sunlight. Rotating the plant regularly also helps them to grow straight up. Moreover, the healthy leaves will turn to a deep green color with shiny surfaces.

  • Watering

Watering

The watering routine is the key to grow the Peperomioides plant. Water this plant at least 1-2 times per week. The filtered water is good for their roots. Distilled water like rainwater contains natural nutrients to increase humidity in the soil. You can manage which water that suits their need. If you put it in a bright site, then it needs more water rather than in a shady place. The watering routine depends on the humidity in a room. This plant is best to grow at temperatures 55°F-85°F.

  • Soil Composition

Soil Composition

Most plants grow well in well-draining soil like the Pilea Peperomioides plant. The fertile composition for this plant is 50% potting mix, 40% cacti soil, and 10% perlite. It creates a fluffy texture for the soil. Mix them well in a container. You can use it to repot the plant or add more nutrients to the soil. This well-draining soil should get well drainages on the bottom part.

  • Fertilizer

Fertilizer

Looking at the plant every day and see what they need to be healthy. If your Peperomia starts growing too slow, it may hungry. You need to add more nutrients into the soil by giving some fertilizer. The composition should be no more than 10-10-10 of NPK. It is good for Peperomia, especially the new growing plant. Don’t forget to read the instructions on the package for your safety. The recommended time to fertilize Pilea Peperomioides is during the fall and winter season, once per 1-2 months.

  • Repotting

Repotting

The overgrowing plant needs to repot into a new pot with fresh soil nutrients. If you see they grow bigger and have lots of baby plants, you need more pot to separate them. Too many plants need more food, water, and space to grow. Choose a new pot 2” inches wider than the old pot. After repotting, your Peperomia may get shocks but it is natural, so you don’t worry. The droopy look is a phase that your plant roots try to adapt to in their new environment and new soil. Give it enough water and sunlight to stimulate the roots systems, then it can grow roots properly.

  • The Common Problems

The Common Problems

Pilea Peperomioides is easy to grow. Even you can grow them from a tiny young plant. The common pests for this plant are spider mites and mealybugs. Get rid of these pests by neem oil spray. You can also wipe the leaves with neem oil solution and take them by hand. Other problems are the changing color of leaves. If you find their leaves are curling upwards, it is overwatering. If their leaves are curling inwards, maybe it gets too much light.

How to Straight Up Their Growth

Pilea Pepperomioides will grow spreadly. The mature plant consumes more space, then you need to manage its growth. Growing it vertically is interesting to try. Here are some tips that you can easily follow. Let’s start with the tools and materials you should know!

  • Bright indirect site
  • Some ties
  • A bamboo stick/wooden stick
  • Pruning shear/scissor

With the gardening tools and material above, you can do this activity more easily and efficiently. The following are some steps you can follow, to grow Pilea Pepperomioides straight and well. Let’s discuss them one by one!

  • Put Them in The Bright Indirect Light

Put Them in The Bright Indirect Light

We have discussed above that Pilea Peperomioides loves sunlight. They will grow and follow the direction where of coming sunlight. Thus, sunlight is the best element for their natural growth. Moreover, you should rotate the plant every week. It ensures that your plant gets enough sunlight for all sides, so it will grow straight up.

  • Pruning The Leaves

Pruning The Leaves

You need to arrange the leaves by pruning the overgrowing part. The pruning results in more new leaves growing. Manage the pruning routine to reduce uncontrolled growing leaves everywhere. Don’t forget to sterile the pruning shear before you use it.

  • Plant The Stick Near Pilea Peperomioides Stem

Plant The Stick Near Pilea Peperomioides Stem

The massive growing Pilea Peperomioides plant needs a supporting stick. You need to tie the Pilea Peperomioides’ main stem with a wooden stick. This stick will support this plant, so they grow straight up properly. Pick some spots on the stem to tie with this stick. It will be safer for this plant growth.

Conclusion

Thus our discussion of Pilea Pepperomioides: Tips to Care and How to Grow It Straight Up. Pilea Perepomioides is an attractive ornamental plant. It has rounded foliages with deep green color, while the young leaves have a lighter green color. Maybe you have this plant at home, especially indoors. Thus, this article is helpful for you to grow them massively. Hopefully, your Pilea Peperomioides will be happier. Happy gardening!

Easy Ways and Simple Tips to Graft The Moon Cactus

0

Homesfornh.com – Cactus is a succulent plant that can live in hard conditions. Many species of cactus you can find in various regions. Moon cactus is one of the stunning cactus species to grow as an indoor ornamental plant. This plant has a colorful head that is easy to notice. If you are a cactus lover, you need to know that the head of your moon cactus can merge with another plant in the grafting technique. The cactus propagation protects your cactus from its dying stock. Sometimes you see the rotten part or drying stock, then it needs to propagate. Get no know more about moon cactus propagation and follow the simple steps below!

Easy Ways and Simple Tips to Graft The Moon Cactus

We know that propagation is important to do if your cactus has a death part. You can save their life in the first place. However, your cactus will be healthier. Several benefits that you can get from propagating the moon cactus such as:

  • Makes your cactus has an aesthetic perspective
  • Stimulates the growth of vegetative
  • Helps cactus to grow well
  • Strengthens the vulnerable cactus roots system

Grafting is a beneficial method to grow an interesting plant by combining two parts of plants. You will get the aesthetic and unique appearance of the moon cactus. Let’s learn how to graft the moon cactus properly. But before that, you need to prepare a variety of gardening tools as follows!

  • Some pieces of paper towels
  • Alcohol in a bottle sprayer
  • A clean sharp knife
  • 10 rubber bands
  • Mother plant/stock/rootstock (it can be cactus or dragon fruit plant)
  • The moon cactus with some heads (scion)

Some people graft the moon cactus when it has more than one scion, then you can do the same for your cactus. Let’s start with the first step!

Straight Cut on The Mother Plant

Straight Cut on The Mother Plant

The first qualification for this mother plant should be a healthy plant that is actively growing. It is the key to get a successful grafting because the roots system will provide enough nutrients for the cutting scion. Always clean the knife by spraying alcohol on it first and wipe it after. Pick the mother plant like a dragon fruit plant, then cut the cactus stem carefully. Cut it for at least 2”-3” inches from the side to side.

Slice The Edges of The Cutting Mother Plant

Slice The Edges of The Cutting Mother Plant

Take a look at the centerpiece of your mother plant. It has a little green ring in a brighter green color. Gently spray the knife and wipe it again. Slice the edges of your mother plant to sterile the area where you will put the scion. Cut it in a little slice and remove all cutting parts. Be careful when you hold this mother plant while cutting the edges. You can spray the knife every time it gets too wet or sticky.

Slice the Lower Part of the Moon Cactus

Slice the Lower Part of the Moon Cactus

Pick the moon cactus that has a proper diameter with the cutting mother plant. Cut the moon cactus with a pruning shear or a sterile knife. See on the bottom side, then slice it gently in a very thin layer. You need to cut it before taking it into the mother because fresh cutting is easier to cultivate.

Part It on The Centerpiece of A Mother Plant

Part It on The Centerpiece of A Mother Plant

In the next part, you will merge the plants, then spray the knife and wipe it again. Do a straight cut on the cutting mother plant, take a thin layer. It is important to renew the fresh cutting stem before you add the moon cactus scion. Put the scion on this cutting mother plant, place it in the right position. Ensure that two rings from both plants engage properly. It helps them to tight firmly during their cultivation time.

Give a Gentle Push by Using Rubber Bands

Give a Gentle Push by Using Rubber Bands

Both cutting plants need a gentle push during their cultivation. Use at least four rings to push it gently and firmly. If it has a little moving, you need to add more rings. Hold the scion and its mother plant when you tie the rings on them. Put this cactus in bright indirect light. The scion will stick and grow properly after 10-20 days. You can remove rubber bands when the cactus grows well.

Care for The Grafting Moon Cactus

Care for The Grafting Moon Cactus

Check the grafting cactus every day to see their growth. You need to treat it like a baby. Good maintenance from the soil nutrients, watering routine, and sunlight are important for their cultivation. The common problem in grafting cactus is the new scions will grow in their shoots. The moon cactus scion also grows some small scions beneath the cutting part. Cut all new growing scions from this plant because they will absorb nutrients too much.

Thus our discussion of Easy Ways and Simple Tips to Graft The Moon Cactus. Cactus is an exotic plant that can grow indoors and outdoors. This plant has many varieties with its attractive appearance. Growing cactus as an ornamental plant gives you several problems like browning leaves, rotting stems, and drying stems. To save their life, you need to cut the sick part or even slice it and grafting it with another healthy plant. Graft your cactus to make it aesthetic and develop the varieties. Hopefully, your cactus will grow healthy and happy. Good luck!

Monstera Deliciosa : How to Care for and Thrive It in Your Home

0

Homesfornh.com – Monstera deliciosa is a tropical plant native to Central America, Southern Mexico, and Panama. It is a popular tropical ornamental plant for the interior and exterior. This plant can grow bigger as a massive growing plant. You may notice this plant by its attractive leaves with some holes. The holes of each leaf are artistic to decorate an interior design. Moreover, it brings a tropical accent to your room. Fenestrations are another name for the holes on each leaf. The sunlight will get through its holes and touch the stem. Thus, it can grow well if it gets enough sunlight. Thriving this plant is exciting, we will give some tips to grow Monstera deliciosa and how to thrive it indoors for decoration.

Monstera Deliciosa Care

Many homeowners love to plant Monstera deliciosa indoors. This plant invigorates a plain room. Besides, it is easy to grow this beautiful ornamental plant, even by the cutting its stem. Let’s find out more tips to care for Monstera deliciosa!

  • Soil

Soil

Soil is an important medium to grow every plant. It contains nutrients that every plant needs to stimulate its growth. Monstera deliciosa grows well in the well-draining soil. Potting mix with perlite is good for Monstera to grow. It has good aeration for the soil. Perlite is a beneficial material to lose the soil textures. Another option is the aeration stones. You can arrange the stones on the soil surface.

  • Lighting

Lighting

No plant can live without sunlight. It is true because sunlight gives energy and natural sources to help their growth. Monstera deliciosa is a tropical plant that needs sunlight a lot. If you thrive it indoors, don’t put it under direct sunlight. Bright to medium indirect sunlight is doing well for this tropical ornamental plant. You can rotate the pot, then your Monstera gets enough sunlight to photosynthesize effectively.

  • Watering Routine

Watering Routine

Every plant needs water. It helps them distribute minerals and nutrients from the soil to all parts of a plant. Monstera deliciosa likes to get adequate water. It can’t stand in soggy soil, then don’t water it too often. You can do a watering routine every week by pushing your finger in the soil and feel the humidity they need. If you see the yellow leaves, it means your Monstera is overwatered, while the underwatered condition makes their leaves turn brown.

  • Fertilizing

Fertilizing

The new growing plant needs enough food. It is a must-have thing at home if you grow some plants, especially Monstera deliciosa. Fertilizer is a source to feed your Monstera. The mature plant doesn’t need much fertilizer. Fertilizing this plant every once two months. It is beneficial to revitalize the soil. If you have a water-soluble fertilizer, you need to wet the soil first. Another option to feed the plant is adding worm castings.

  • When to Repot The Plant

When to Repot The Plant

Many reasons to repot your Monstera deliciosa. If your plant grows bigger and larger, it needs a new medium to spread its roots. The pot can’t hold the roots any longer because it will make your Monstera stop growing well. You can move this plant into a new pot at a range of 2”-4” inches bigger. Give new potting mix to make it happy.

  • Daily Care

Daily Care

Good maintenance makes your Monstera deliciosa grows bigger. Observe your plant when you see some symptoms of pests. Even though this type of Monstera is pest-resistant but checking the plant will guarantee their health. Mealybugs and spider mites are the common pests in this Monstera leaves. You can spray water-soluble with an organic pesticide like neem oil. Another thing to consider is their dirty leaves. Thriving indoors invests many specks of dust on the leaves, then you need to wipe it gently with a wet fabric or paper towel.

How to Thrive Monstera Deliciosa Indoor for Decoration

Monstera plant looks stunning for your interior design. It invigorates the ambiance with a tropical vibe. You can use this ornamental plant for a variety of interior designs you want, especially bohemian or tropical. You can thrive it indoors in a certain area to bring a green accent as below!

  • Monstera Deliciosa on The Windowsill or Glass Door

Monstera Deliciosa on The Windowsill or Glass Door

The window sill is a beneficial spot to grow Monstera deliciosa. It provides bright indirect for their leaves. Moreover, the bright area makes it looks clean and shiny. The window sill can stimulate the young Monstera to grow well. Another site to grow Monstera is near the glass door. Put it on near your glass door as a stunning decoration for the entryways.

  • Wall Creeping Plant Monstera Deliciosa

Wall Creeping Plant Monstera Deliciosa

Monstera deliciosa looks stunning to creep on the wall. You can swirl the creeping stem on a stick to grow them vertically. It will grow well as long as it gets bright indirect sunlight. The creeping Monstera is easy to form into an attractive decoration. It needs to prune when the top leaf touches your ceiling. Prune it under the note then it can grow new roots.

  • Massive Grow Monstera Deliciosa as A Natural Partition

Massive Grow Monstera Deliciosa as A Natural Partition

Are you looking for a new idea for partition? Monstera deliciosa can help you with this. It will grow massively indoors if you give good maintenance for them. Thrive this plant indoors to separate the open-plan rooms. It transforms into a natural partition when it grows more giant leaves. The mature leaves have a deeper green color rather than the young leaves. You can grow more than one Monstera plant to create an indoor tropical garden.

  • Monstera Deliciosa to Decorate Your Corner Space

Monstera Deliciosa to Decorate Your Corner Space

The corner space is an interesting spot to grow Monstera deliciosa. You can see this plant from every angle and it is easy to notice, then it looks stunning to decorate the interior design. Moreover, the corner space with a window sill is beneficial to provide natural sunlight for this Monstera plant. It will grow well and maybe needs a strong wooden stick to hold the stem firmly. This plant looks nice to thrive indoors as a single plant, but you can put other plants too.

  • The Young Monstera Deliciosa in A Standing Planter

The Young Monstera Deliciosa in A Standing Planter

Monstera deliciosa is easy to grow by the cutting stem. Collect all cutting stems in one vase and plant them after the roots grow. Use an attractive standing planter to help this plant gets more light. The thing you need to know is their leaves will produce fenestrations during the growth process. Be patient if the young leaf has no fenestrations because it will grow when they more mature.

Conclusion

Thus our discussion of Monstera Deliciosa: How to Care for and Thrive It in Your Home. Monstera deliciosa is a popular tropical plant to thrive indoors. You can grow this plant from the cutting stem or the mature plant. This plant can grow massively if the environment is good. Getting enough water, sunlight, fertilizer, humidity and well-draining soil is the essential combination to grow them well. Care for your Monstera deliciosa like you take care of yourself. They will be more beautiful with your hand. Happy gardening!

Don’t Wait to Repair Cracks in Basement Floors

0

There are lots of approaches to addressing moisture in your basement. Some homeowners find that the most cost-effective way to fix the problem is to simply remodel the basement and remove existing damp areas. This might include installing new insulation, finishing your basement windows or installing an exhaust fan in the attic. Here to learn more!

You should also think about taking the Denver basement waterproofing company services. In many cases, all you have to do to repair cracks in the basement floor is to replace the worn-out linoleum with new vinyl linoleum or remove the cracked area around your windows and replace it with newer ones.

Basement Waterproofing System:

Homeowners who want to know how to repair cracks in basement floors should also look into basement waterproofing systems. There are two basic types of basement waterproofing systems – passive and active. A passive system is less expensive and requires less upkeep. It’s designed to add a layer of plastic to the inside of your basement walls and then pump water away from the home by way of a natural underground drainage system. An active system does the same thing, but with more direct access to the home’s foundation.

Wet Basement:

Basement water leaks are an unfortunate fact of life. If you own a home, you are likely to experience a wet basement at some point in your life. In fact, of all homes that have a basement, more than 98% will experience some form of water damage. Mold, mildew, rotting wood, and foundation problems as follows. Learn more about – How to find basement water leaks.

When you waterproof your basement, you are waterproofing for the interior of the house as well. A wet basement foundation poses the same threat to your home as regular basement dampness does, so it’s a real threat. Wet basements are also very difficult to repair because they have accumulated so much water that the only way to release the water is to dig holes in the ground and then pump the water out – a costly, time-consuming project that nobody has time for. A basement waterproofing system will seal off the basement and prevent future moisture problems, allowing you to spend your time doing other things, like fixing your roof, putting up walls or even buying a new home.

Repair Cracks and Leaks:

Even if your basement floods every once in a while, you can take steps to avoid having to repair cracks in basement floors. If your basement floods all the time, install a waterproofing product at the baseboard and interior side of your basement walls. These products will stop leaks before they even start. You can also protect your basement floor by using non-slip floor mats and carpet runners. You can also use special basement waterproofing chemicals that you apply yourself or purchase in any home improvement store.

Automatic Pump:

If your basement floods all the time, or if you just want to be extra safe, you can purchase an automatic basement waterproofing pump. These pumps don’t require you to physically move heavy items or clean affected areas, which makes them ideal for basement cleanup. Because the basement is a smaller area than your house, there’s less chance for structural damage to your home. The investment isn’t worth it if you aren’t going to use it. That’s why basement waterproofing isn’t something you should put off until it’s necessary – it will keep you and your family safe.

Easy Ways to Grow Dendrobium Orchid Plant in Charcoal

0

Homesfornh.com – Orchidaceae or orchid family has varieties of orchids with different root systems. Dendrobium orchid is one of the orchid varieties that grow well in charcoal. Growing orchid in charcoal is not a new way. It is one of the mediums to plant orchids. This plant likes to grow in a well-draining medium and charcoal has a good drainage system. Maybe you ever find an orchid in other mediums such as sphagnum moss, coconut peat, and tree. Orchids will die slowly if you plant them in the regular soil, thus this plant needs a special medium to grow well. If you want to know how to grow orchids in charcoal, let’s discuss the steps below!

Why Do We Use Charcoal to Grow an Orchid Plant

Why Do We Use Charcoal to Grow an Orchid Plant

Many reasons why some people choose charcoal as the main material to grow orchids. It is an easy material to get and you can even make it at home. Thus, we want to give you some reasons that charcoal is a beneficial material for an orchid.

  • Charcoal has good drainage
  • It makes your orchid stands firmly in the pot
  • Charcoal eliminates the odor because it absorbs the decaying materials
  • Charcoal kills bacteria because it binds the ammonium and nitrogen
  • The hardwood charcoal takes years to degrade, so you don’t need to renew the medium
  • Charcoal can absorb salt and lower the salt that is built in the pot

How to Grow Dendrobium Orchid in Charcoal

Dendrobium orchid is a beautiful orchid that will bloom pink and white colors. It is a little bit tricky to grow Dendrobium orchid. Thus, we will give a simple guide to help you grow this orchid. Here are some things that you can prepare for planting dendrobium orchids.

  • One clay pot/terra cotta pot
  • Horticultural charcoal
  • Orchid mix
  • Orchid fertilizer
  • Lukewarm water

After knowing the various preparations that you have to do, the next topic that we will discuss is the various steps you must take in growing orchids. To plant orchids, there are several things that you need to prepare to start from simple things to complex things. Let’s discuss the various steps you have to do.

  • Wash The Charcoal and Soak The Orchid Roots

Wash The Charcoal and Soak The Orchid Roots

The first step to do is washing the charcoal. We know that charcoal is made of burning wood, then it produces dust on each charcoal piece. You may not see the dust but it will feel the dust by breathing and touching, so you should take all charcoals in a bucket with adequate water. While you wash the charcoal, soak the orchid plant in clean water. This step is beneficial to remove all dirt and reduce the shocking plant.

  • Take The Clay Pot and Arrange The Old Charcoal with Orchid Mix

Take The Clay Pot and Arrange The Old Charcoal with Orchid Mix

Take your clay pot, check the bottom to see drainage holes. You can replace the pot with another pot if you don’t have it. The clay pot is a good drainage container because it absorbs water properly. If you have some old charcoal in your garden, you can fill the pot with these materials. It will raise the orchid from the bottom and reduce the use of clean charcoal. Fill 1/2 of the pot with this charcoal and orchid mix. You can’t use the regular potting mix for orchids because it doesn’t suit their roots.

  • Put Your Orchid in The Pot

Put Your Orchid in The Pot

This step looks easy sometimes, but you need to reduce the water on the roots before transplanting this orchid. Orchids can’t stand in water too long because it will damage their roots. Make sure that you wipe the roots after soaking them in water. Put in a central position for an orchid to give a comfortable site and let the roots travel freely. You can arrange the charcoals beneath your orchid to cover big spaces in a pot. It is better to arrange them based on the size like a lego game.

  • Add The Washed Charcoals to Cover Your Orchid Roots

Add The Washed Charcoals to Cover Your Orchid Roots

Take the charcoals from a bucket after you wash them. Arrange these clean charcoals in your pot and cover the orchid roots properly. Sometimes, it is not easy to make an orchid stands in the charcoals, so you should put the right size of charcoals to support its stem. It is important to put the clean charcoals in the top layer because it gives less dust around your orchid and even for you.

  • Water Your Orchid

Water Your Orchid

After planting the orchid, you need to give it water. Pour lukewarm water in a watering can, if you have it, then watering your orchid slowly and thoroughly. There is a tip to water an orchid, don’t spill water on their leaves. If it does, you have to wipe it by using a napkin or paper towel. Orchid leaves can’t hold water for too long because it causes rotten leaves. Use lukewarm water at least once a week since it is an exotic plant that natives to a warm tropical area.

  • Fertilizing the Orchid

Fertilizing the Orchid

The orchid plant is not a heavy feeder. It is fine to give fertilizer once in two weeks. The orchid fertilizer is a water-soluble fertilizer that you can pour into a watering can for fertilizing. You can buy this fertilizer in a gardening shop or the online shop. Nitrogen (N), Phosphorus (P), Potassium (K), or 20-20-20 NPK fertilizer to set healthy buds.

  • Set a Good Site for Orchid

Set a Good Site for Orchid

Growing an orchid after transplanting the plant into a pot, you have to put it in bright indirect light. Don’t put an orchid in a sunny place because it can burn its leaves. You can put it in a shady place and gradually move it into a warmer place to see which site suits your orchid. Don’t move them too often in a drastic climate because it will get a shocking symptom.

  • Simple Care for Orchid

Simple Care for Orchid

It is not complicated at all when dealing with an orchid. Growing this plant in charcoal is such a beneficial medium. You need to care for your ornamental plants if you want to see them happy. Never cut the roots even though you see them crawling in the air. Let it as their nature to travel and grow new buds. As it grows new buds, don’t separate it into a personal plant because you will ruin its nature. Let it be one and you just water it to make it healthy.

Conclusion

Thus our discussion of Easy Ways to Grow Dendrobium Orchid Plant in Charcoal. These are all the short and simple guides for you to grow Dendrobium orchid in charcoal. There will be some problems that you may face when growing every plant, but it takes time for you to understand their needs. We hope this short guide is helpful for you to grow Dendrobium orchid and care for this plant. We’d love to see your orchid garden as beautiful as it will be. Happy gardening!

Easy Fixes to Saving on Energy Bills This Summer

0

Summertime is the perfect time of year for getting outside and enjoying the sun. The warmer weather opens up more activities and possibilities for fun. Of course, it’s also a time when the costs to cool down your home can skyrocket. You shouldn’t have to wreck your budget to stay comfortable in the heat. Your HVAC system will work overtime, but luckily, it should be covered by a home warranty if it starts to have problems. Keeping this system in good order is just one of the ways you can save money on your electric bill during these months.

Check Your Filters 

Keeping your energy costs down doesn’t have to involve anything complicated. Simple steps can make a big difference in how much you spend each month. Start with your air conditioner. If you aren’t changing the filter each month, start doing so now. A clean filter will keep dirt, dust, and other particles from getting into the system. It will also help your air conditioner to run more efficiently. If you fail to regularly replace the filter, your unit will have to work harder and stay on longer to keep the house cool.

Pay Attention to the Thermostat

Programming your thermostat can save you big bucks throughout the summer on your energy bill. Set the temperature higher at night when it’s cooler outside, instead of leaving it at the same spot all day long. Be mindful to keep it at a temperature you’re comfortable with, balancing it with a level that won’t keep the AC on all day.

Service Your HVAC system 

Again, you can expect the HVAC system to get a workout when the temperatures outside are high. If your system isn’t in good shape, your house won’t cool down, and the AC will stay on much of the day. This can escalate your monthly electric bill. Before the summer months come, call an HVAC professional to inspect the air conditioner and all its components. A tune-up can help it perform at peak levels.

Close Down Openings in Your Home 

For some people, it may be counterintuitive not to open windows and doors during the summer. After all, wouldn’t some circulation in the house be good for cooling it down? The truth is, having any gaps in your house will invite the cold air from the AC unit to escape. This means your house won’t get cool enough for the HVAC system to shut down. You should also check for gaps around your windows and doorway. You may need to fix the weather stripping and reseal these areas with caulk.

Keep the Lights Off

During the summer, you have a lot more daylight hours than at other times of the year. There’s no reason you need to have your lights on all day. Save this until the sun has gone down. Keeping your lights off can reduce your electric bill each month. Don’t forget to turn off outdoor lights in the morning either.

Run a Full Dishwasher

In the summer, more people in your family are likely to be home more often throughout the day. Kids are out of school, and you may even be home from work a few more days than usual. As the kitchen dishes start to pile up, you may feel inclined to run the dishwasher frequently. Always fill it up before you start this appliance. The less often you run it, the more you can save on your energy bill.

You don’t need to have outrageous electricity costs this summer. Implement these ideas into your daily living, and you will see a difference in how much you spend.


Infographic Provided By Solar Panel Installation Company, Sunburst Solar